Making resin crafts is an exciting process because we will create beautiful crafts, and everyone wants to create flawless resin crafts with no air bubbles. However, bubbles are inevitably generated in the resin during the curing process.
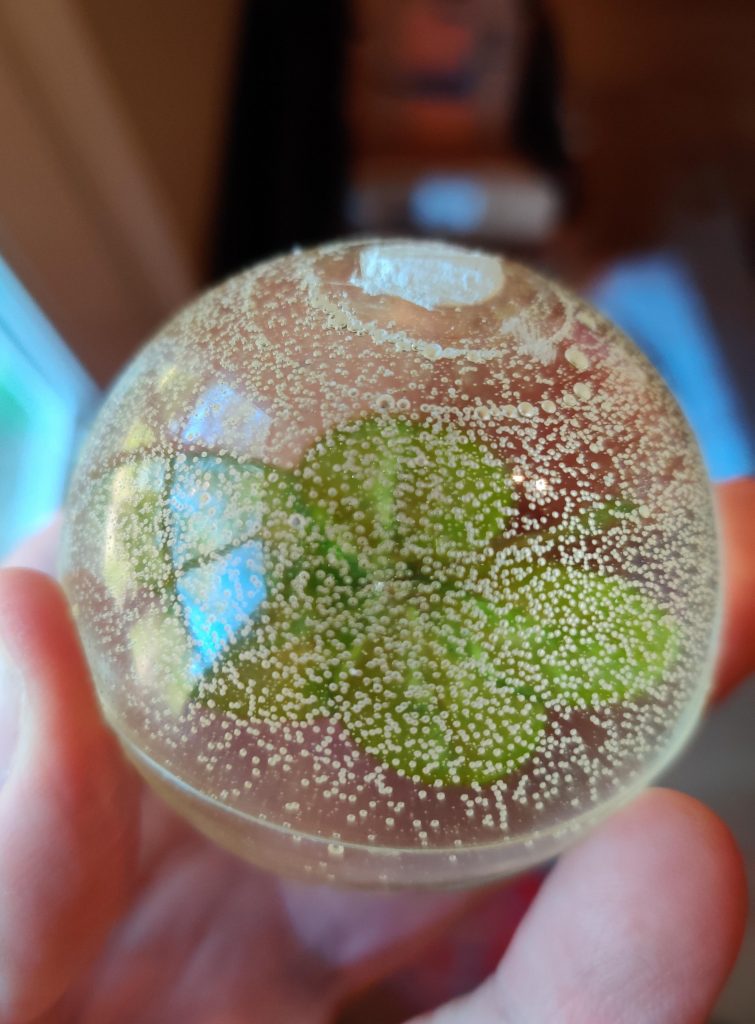
Table of Contents
What Causes Bubbles In Resin?
Do you encounter a lot of annoying bubbles in the resin when you are doing DIY resin crafting? There are many reasons for these bubbles to emerge. Here are the 3 most common causes of these bubbles in resin:
Reaction
The repulsive reaction between the resin, paper and adhesive used in the resin-making process causes the resin to burst, causing troublesome small bubbles in the resin.
Exhaust
In different climates and temperature environments, when we use some inferior materials such as wood, porous materials, leaves, etc., air and moisture will penetrate into these materials. These materials continue to release air even after being covered with resin. This process is called venting, and it causes air bubbles to form in the resin.
Low temperature
If your working environment is below 75-80 F or 24-30 C, and the resin is cold, its consistency can be thick and lumpy, and thousands of micro-bubbles will appear, so it also It will appear cloudy or turn milky white. Even with a flashlight, you’ll have a hard time getting rid of these bubbles.
How To Remove Bubbles From Resin?
People are always looking for flawless resin crafts, and it would be imperfect if there were some air bubbles in resin crafts. Because bubbles found in resin crafts can ruin the project’s appearance, it is imperative to get these bubbles out of the resin before it cures. Here I will introduce some quick and effective ways to eliminate these bubbles and make your resin crafts perfect again!
1. Cast resin in a warm room
The ideal temperature for resin to cure is 70-75 degrees F. It is recommended to choose a small part of the house, such as a closet or bathroom, and have a heater ready to run all the time to keep the temperature at the perfect rating for the resin. Using a portable heater is more than enough. A “hot box” is a very convenient way to heat the resin for small resin processes.
2. Selecting the right resin,Work in thin layers
Before you start making a resin mold, it is crucial to choose the right resin material.
For example, a thinner resin is the right choice if you want to pour the resin into a mold or a border. Because it has a lower viscosity, it has a lower probability of creating air bubbles. If some air bubbles still form in your mixture, don’t worry. They are quickly released because your resin and hardener mixture is thinner.
Again, you don’t have to use all of these techniques (some of the things I make require thicker layers, so sometimes I ignore that technique).
3. Mix resin and hardener carefully
Usually, you need to be careful when mixing resin and hardeners. You are not scrambling eggs, don’t rush. Take 3-5 minutes to mix them slowly. Mixing too fast will cause a lot of bubbles to appear. Usually, when dealing with a lot of resin and hardener, it is inevitable to produce bubbles. When you pour or cast resin, some bubbles may float to the surface of the resin.
4. Wait 5 minutes after mixing the resin and hardener.
Please take a moment to wait, about 3-5 minutes, depending on how your resin brand behaves (resin deflates, bursts on its own), so please read the resin instructions before use.
5. Use a hot air gun or lighter
This is the most convenient and effective method, our most recommended method, but you must be very careful with the flame near the resin and use the flame to stay on the resin surface too long to ensure a quick finish.
This means only 1-3 seconds of heat exposure at a time, and I recommend repeating this step 1-3 times with a few minutes of waiting time in between to allow the resin to cool. Judging by our experience, it probably won’t allow your resin to harden for several months fully.
Typically, if you go beyond 3 seconds of excessive flame use, the cured resin will have a grainy, sticky texture on the surface rather than a smooth, clean surface.
6. Allow air bubbles to escape naturally
When the resin and hardener ratio is relatively dilute, the mixture usually has a thin viscosity, so they do not have a high probability of forming bubbles. If you encounter bubbles on the resin surface, please be patient and wait some time to let the bubbles escape naturally. The principle of natural escape of bubbles is that because the mixture is thinner, bubbles tend to release more easily from the resin surface. However, this only applies to thinner resin mixtures and not thicker resin mixtures.
7. Manual targeting of stubborn air bubbles
You can use a toothpick or sewing needle to manually pierce the air bubble to release the air inside the bubble. This process is slow and usually works for smaller pieces of resin artwork (jewellery, as of, earrings, dice, etc.). Everyone has a hair dryer in their home. The slightly hot air from the hair dryer helps remove bubbles, but it is not as hot as a heat gun to effectively remove more bubbles. Mica powder or liquid resin mixture can also be used to reduce the expressive tension of the mold to prevent bubbles from appearing on the resin surface.
8. Pouring the resin correctly
Before filling, slowly and evenly pour a small amount of resin into the mold or rim to ensure the even distribution of the resin, which helps to break the surface tension. This principle is similar to the clockwise or counterclockwise direction you use when pouring wine, which will prevent bubbles from forming. Once you have poured in a resin layer during the introduction process, use a heat gun to heat it to remove air bubbles. Once you have completed this step, repeat the entire process, pouring one layer on top of another to prevent the formation of air bubbles. When filled, allow the mixture to sit and dry. This will take about 2-3 hours.
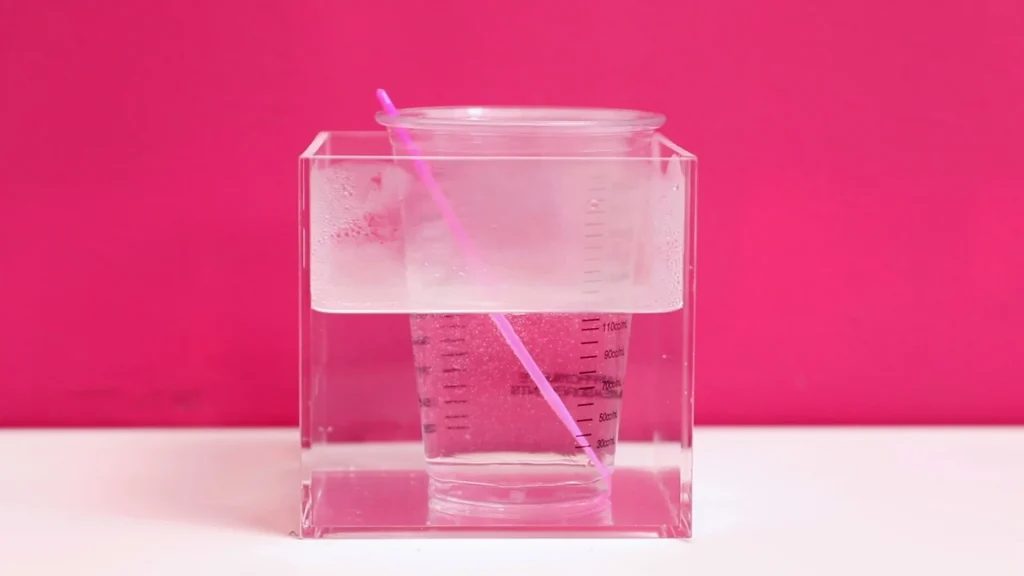
9. Using the pressure chart
We recommend using pressure drawing to remove air bubbles when making large resin crafts. You use a hard object (such as a pot) with a large flat area and place the mold into it while using force to create pressure to reduce the air bubbles. To ensure that the resin is free of air bubbles, you must keep the pressure on the mold during the process.
10. Heating the resin in water
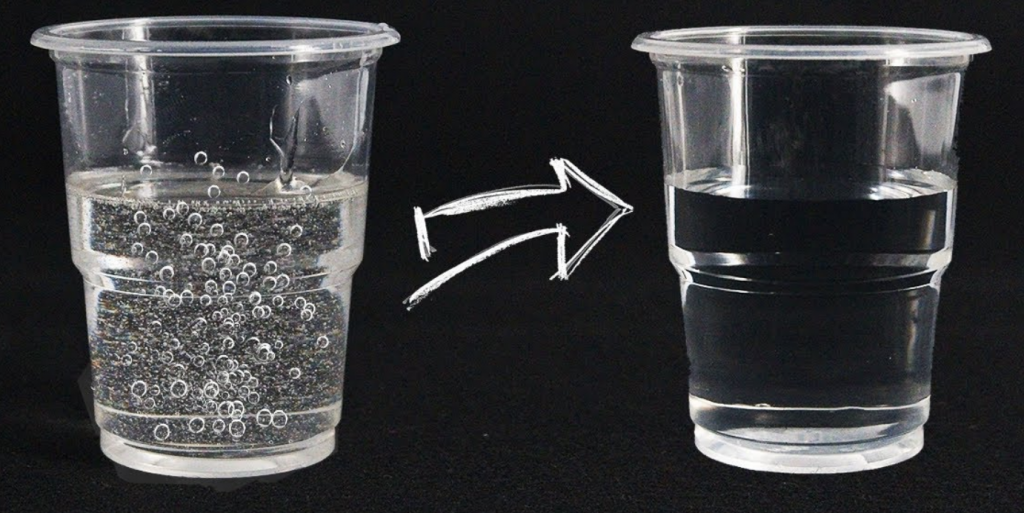
This is because cold resin equals a lot of trapped air bubbles, and to get the best results from the resin, you need to heat it. The cold resin will have a lot of trapped air bubbles, so this is something we don’t want. Conversely, if your resin is significantly heated, it will have fewer bubbles. Of course, you can’t heat the resin directly; instead, putting it in hot water will solve your problem.
You can put the resin in a plastic bag and place it in water. By heating the resin in warm water and pouring it into a thin layer, you can eliminate more than 90% of the air bubbles. A 20-minute warm water bath will do wonders for you!
11. Eliminate surface tension with powder
When pouring resin into complex molds, you can use baby powder to eliminate surface tension. This will prevent new bubbles from forming when molding the resin. In addition, multiple de-molding will also help eliminate bubbles with curves and depth in the mold. Pouring the resin on all sides of the mold before filling the mold with resin will prevent any bubbles from forming on the sides and reaching the middle.
12. Sanding and re-pouring
If you have cast a resin artefact and it has dried, but there are still bubbles on the surface or underneath it, you can use sandpaper to trim the surface. This works especially well for flat pieces. It can also be used for pieces that are not flat but can still be trimmed with sandpaper. When finished, clean the surface and reapply a thin layer of warm resin.
13. Mixing from the bottom up
Mix by stirring (either manually or electrically), slowly stirring from the bottom to the surface. The process will naturally push all large or small air bubbles to the surface and release them. We do not recommend mixing in deeper containers (such as buckets) as this will trap the bubbles and prevent them from releasing.
How to remove air bubbles from cured resin?
What to do when you find those pesky bubbles after your resin craft has cured? Don’t worry. Although there is no way to get rid of air bubbles directly from the solid-state resin, there are still ways to get rid of them.
If you have tried the methods mentioned above to remove the air bubbles in the resin, there is a high probability that the remaining air bubbles are under the surface. First, we need to find out where the air bubbles exist in the resin and then sand the surface until the layer with the air bubbles is eliminated. After sanding, use a damp cloth to remove surface residue, apply a fresh coat of resin, and you’ll find it takes you back to the same place again after you’re done.
Finally, apply a fresh, warm, thin coat of epoxy to fill in the lost surface area. After waiting to cure, your resin work will look perfect without air bubbles!
Going through all the trial and error takes time, and working with resin can be tricky. You have to be very careful to avoid wasting time with unnecessary mistakes. Follow the instructions and tips above to get perfect artwork without bubbles. It’s a long list of rules to follow, but trust me, the results are worth it.